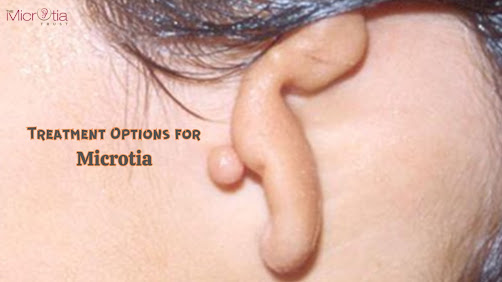
Step-by-Step Details of Microtia Ear Surgery with Rib Cartilage

Microtia ear surgery with rib cartilage, or autologous ear reconstruction surgery, is a standard reconstructive operation to correct a congenital outer ear malformation or underdevelopment called microtia. As per Ear Reconstruction Doctor in India, microtia ear surgery with rib cartilage is primarily recommended to fix grade 3 or 4 microtia, and sometimes grade 2 microtia. However, grade 1 microtia is fixable with simple otoplasty or composite graft transfer from a normal ear.
Microtia ear surgery is ideally done for children with microtia aged between 7 and 10 years, as by that time they have achieved complete facial structure development and have enough rib cartilage required for successful ear reconstruction. This operation provides microtia-affected children relief from a severe psychosocial penalty. In some cases, it even helps restore normal hearing to improve a child’s relationships with others and performance at school.
Let’s further gain deeper insight into multi-stage microtia surgery with rib cartilage by studying its detailed procedure. It may be a help to make a well-informed decision.
Note: The actual surgery steps may vary based on the grade of microtia being treated, and the patient's personal needs. The surgeon may use either of two approaches: the Brent technique (3-4 stage surgery) or the Nagata technique (2 stage surgery).
Detailed Breakdown of Surgical Process of Microtia Ear Surgery with Rib Cartilage
Preparation:
Consultation and Evaluation- Parents or legal guardians of the child with microtia need to meet an otolaryngologist or plastic surgeon with specialisation in microtia ear repair. During the meeting, the patient’s medical records are reviewed, and the patient is physically examined to ensure the patient is a suitable candidate for surgical ear reconstruction. A hearing specialist may also be involved during pre-operative evaluation to check hearing loss.
Creation of Tailored Surgical Plan- The surgeon will decide on the surgical approach (Brent or Nagata Technique) based on the patient's needs. The amount of cartilage to be removed will be figured out by the surgeon. After the whole procedure is planned, the surgeon will share the details.
Pre-Operative Guidelines- The surgeon will provide detailed instructions to make the patient ready for the day of the surgery. This includes arranging for transportation, medication adjustments, and overnight fasting.
Preparation of Patient and Family- The surgeon will make sure, before the surgery day, that both patient and family are thoroughly informed about the procedure and are mentally ready to go ahead with the surgery.
The Surgery:
Anaesthesia- To make sure the patient remains comfortable throughout the procedure, general anaesthesia is typically administered.
Making of chest incision- The surgeon makes a slightly oblique chest incision over the 6th-8th ribs, close to the sternum, on the side opposite of normal ear, to harvest the cartilages with minimal risk of noticeable scarring.
Harvesting of rib cartilage and sculpting of new ear framework- The surgeon takes cartilage from the 6th and 7th ribs to meticulously carve out the base of the new ear and utilizes the cartilage piece from the 8th rib for sculpting the ear’s helix or rim. 3D print models of the normal ear of the patient are taken as a guide. At the end of this step, a new ear framework is constructed that mimics the natural ear in both feel and appearance.
Placing of reconstructed ear framework- In the area marked for new ear implantation, the surgeon makes an underneath skin pocket. The sculpted ear framework is carefully and correctly inserted in the right anatomical position, and thereafter, local tissues are used to wrap the ear for protection and support. Skin flaps or fascia may be used to ensure a natural-looking ear and secure the framework.
Incision closure- The cuts made for framework placement and for harvesting of cartilage are all sewn. Sterile dressings may be applied to protect the operated areas. Finally, the patient’s ear and chest are allowed to heal for several months. This marks the end of stage 1 of the surgery.
Ear elevation and final detailing- After the healing period, the patient has to again visit the surgeon for further detailing. Firstly, the surgeon makes a postauricular incision to normally project the new ear. Then, the surgeon creates retro retroauricular sulcus (groove behind the ear) using a skin graft from the patient’s groin or buttocks. If required, the surgeon creates the tragus- the small flap of cartilage in front of the ear canal.
Post-Operation
The patient will be experiencing some pain or discomfort that is manageable with prescription medicines. Until the ear completely heals, the patient will have to avoid strenuous activities, contact sports, or anything that could injure the healing ear. Regular follow-up appointments with the surgeon are a must to ensure an optimal healing period. Rest, the patient and family must be completely involved in following the detailed aftercare instructions provided by the surgeon after the operation.
Where to get Microtia Surgery in India?
In India, one can visit Dr. Parag Telang, a famous microtia ear surgeon who practices at The Microtia Trust. He has helped many patients with their microtia ear cosmetic concerns and has performed this extensive surgery skillfully. Consult him for more details about the microtia ear reconstruction procedure.

Comments
Post a Comment